本文主要是记录自己平时关注的一些细小知识,但是单独出一篇blog又特别水的这类知识,长期更新。
临时使用
对于放一半的流程是这样的:如果本地的runnext和local runq都满了的话,就需要将一部分g放到global runq中,选取的原则是将local runq中后半部分和runnext中的g组合一起放到global runq中的尾部,之所以选择后半部分,我的理解是:对于当前的P来说后半部分和runnext中被赶下来的g,即使在本地P中也是要往后稍稍的角色,所以索性就把他们放到global runq中,前半部分的已经等了很久了,P必须要照顾一下他们的情绪。
对于取一半的流程,如果是从全局队列中获取一半,那么是从global runq中拿出(全局队列g总数/gomaxprocs)+1个,但是不能超过local runq的一半——128个,这里我们可以这样理解: 对于全局队列来说我们肯定要先获取其位于队首那部分的g,因为他们已经排队较久了,如果拿到其他部分的话那么对于P来说他肯定要先执行自己local runq上的g,这样global runq上的g又可能会有等待的情况,这样对于global runq队首元素来说是不公平的,所以我们在从global runq中取g到自己的local runq中时,要取global runq的前面的元素。如果这样你能想通,那么你肯定也理解为什么从取出来的这些g队列中取第一个来进行执行。
当然你肯定也听过steal,就是偷去其他p中的g队列放到自己这里来执行,如果你问:“为什么对于其他p的runq也是取偷取前面的g并且执行所偷的g队列的最后一个元素呢?”,抱歉我也百思不得其解,可能是为了参照拿取global runq的逻辑,但是为什么又拿了最后一个g去执行。。。这里确实有点迷。
对于取一半的流程,似乎不同的场景下获取的逻辑不一样:
对于runqsteal来说,他每次是偷其他的P的前半部分g放到自己的P的队列中;但是是将最后一个g拿出啦进行执行,这里和其他情况下通常取队列头部的g进行执行的逻辑不通,但是为什么这样不是很清楚,有点迷;
但是对于globrunq,额。。。刚才发现也是把前半部分拿过来;并把前半部分中的第一个g关联到m上进行执行;
这其实也是正确的,因为前半部分的g是等待时间比较长的了,并且后半部分的g可以更加地利用局部性原理。
看了一下systemstack的逻辑流程,可以发现其中是将对战切换成了g0;函数位置在asm_amd64.s:333的runtime.systemstack;
goready会切换到g0然后运行ready程序,将要恢复的g放到当前关联p的对应接列中;他的逻辑像新生成一个g的时候是一样的,想放到runnext指针中,然后放到localrunq,最后放到global runq中。
gopark函数会将当前g的相关状态保存后,m直接放弃当前的g,直接关联g0并执行park_m函数来schedule获取可执行g;
相关代码注释如下:
 func gopark(unlockf func(*g, unsafe.Pointer) bool, lock unsafe.Pointer, reason waitReason, traceEv byte, traceskip int) {
	if reason != waitReasonSleep {
		checkTimeouts() // timeouts may expire while two goroutines keep the scheduler busy
	}
	mp := acquirem()
	gp := mp.curg
	status := readgstatus(gp)
	if status != _Grunning && status != _Gscanrunning {
		throw("gopark: bad g status")
	}
	mp.waitlock = lock
	mp.waitunlockf = unlockf
	gp.waitreason = reason
	mp.waittraceev = traceEv
	mp.waittraceskip = traceskip
	releasem(mp)
	// can't do anything that might move the G between Ms here.
	// 上面的代码是对当前的m和g进行一些状态记录,下面的mcall涉及到具体切换
	mcall(park_m)
}

// 下面代码是asm_amd64.s中的mcall函数
// void mcall(fn func(*g))
// Switch to m->g0's stack, call fn(g).
// Fn must never return. It should gogo(&g->sched)
// to keep running g.
TEXT runtime·mcall(SB), NOSPLIT|NOFRAME, $0-8
	// Save caller state in g->sched
	// 将当前寄存器信息保存到g->sched的gobuf中,我们知道gobuf是当前g的现场,下面的保存数据都是我们熟悉的sp、bp、pc等
	MOVD	RSP, R0
	MOVD	R0, (g_sched+gobuf_sp)(g)
	MOVD	R29, (g_sched+gobuf_bp)(g)
	MOVD	LR, (g_sched+gobuf_pc)(g)
	MOVD	$0, (g_sched+gobuf_lr)(g)
	MOVD	g, (g_sched+gobuf_g)(g)

	// Switch to m->g0 & its stack, call fn.
	MOVD	g, R3
	MOVD	g_m(g), R8
	MOVD	m_g0(R8), g
	// BL即跳转到runtime·save_g来保存g的信息
	BL	runtime·save_g(SB)
	CMP	g, R3
	BNE	2(PC)
	B	runtime·badmcall(SB)
	MOVD	fn+0(FP), R26			// context
	MOVD	0(R26), R4			// code pointer
	MOVD	(g_sched+gobuf_sp)(g), R0
	MOVD	R0, RSP	// sp = m->g0->sched.sp
	MOVD	(g_sched+gobuf_bp)(g), R29
	MOVD	R3, -8(RSP)
	MOVD	$0, -16(RSP)
	SUB	$16, RSP
	BL	(R4)
	B	runtime·badmcall2(SB)
上面代码中的BL runtime·save_g(SB)其实我在刚看mcall代码中就有点不是很明白,因为我们在mcall的上半部分已经保存了g的相关信息,并在gopark中也保存了部分信息,为什么还需要进行保存呢,于是我查看了save_g中的代码看了一下,发现这里应该是和cgo相关的(目前cgo不是我关注的点,所以不去了解),下面展示一下代码:
TEXT runtime·save_g(SB),NOSPLIT,$0
	MOVB	runtime·iscgo(SB), R0
	CMP	$0, R0
	// 如果iscgo的返回值R0等于$0,那么就跳转到nocgo处执行
	BEQ	nocgo

	MRS_TPIDR_R0
#ifdef GOOS_darwin
	// Darwin sometimes returns unaligned pointers
	AND	$0xfffffffffffffff8, R0
#endif
	MOVD	runtime·tls_g(SB), R27
	ADD	R27, R0
	MOVD	g, 0(R0)

nocgo:
	RET
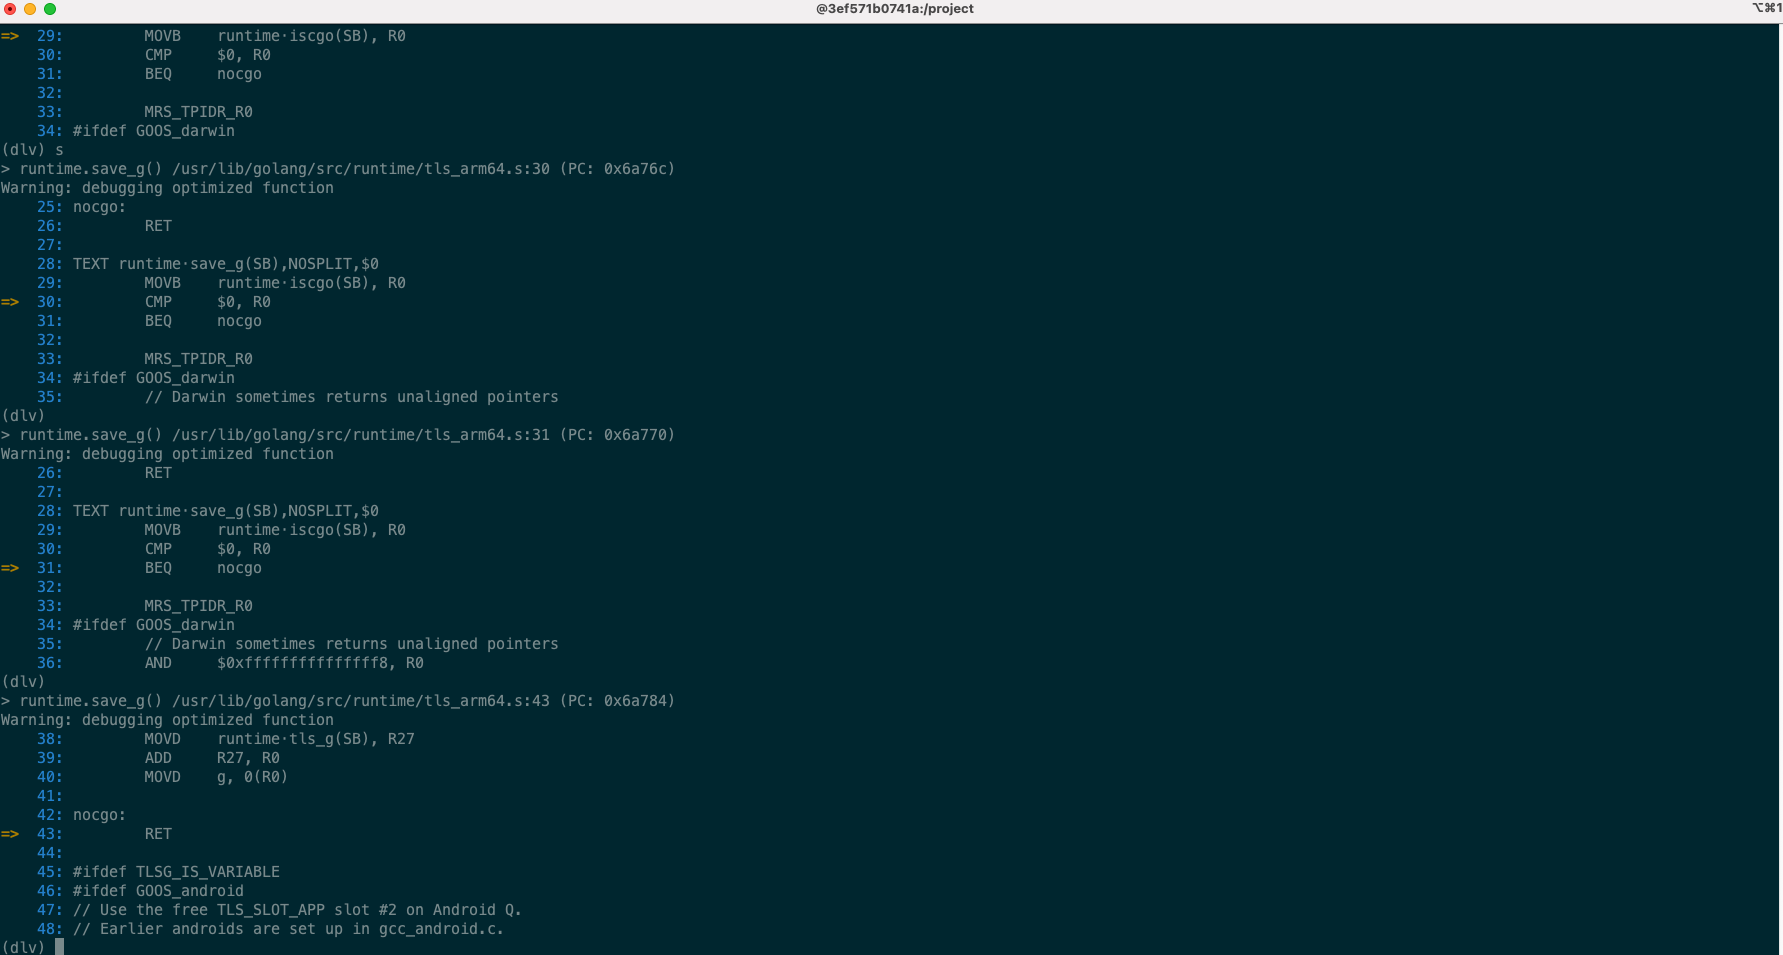
所以如果你是arm64架构并且不设计到cgo,那么这里应该没有什么作用,并且通过调试我们也可以发现直接RET了,如下图所示:
mcall后面暂时不是我感兴趣的了,就是切换到g0后直接调用mcall中的park_m进行执行,就是选取可以执行的g。
sysmon中的retake函数会执行handoff来解绑m和p;然后再调用startm来让p重新绑定新的m
pageAlloc分配大页的函数中,其中有维持这些大页的结构;pāgeAlloc结构经过多个版本的变化,从: freelist->treap->radix tree,查询时间复杂度越来越低,结构越来越复杂。
看了一些关于context代码的分析,感觉自己不太适合,尤其是关于propagateCancel这个函数的解释,我自己阐述一下:
首先我们知道cancel context拥有parent context如果cancel后,如果他的子context是cancel context(这里我默认通过WithDeadline和WithTimeout创建的也是cancel context)的话,那么也会被cancel(前提是你配合Done()这个函数) ,能实现这个功能的就是因为在创建一个cancel context的时候去关联最近的cancel类型的祖先节点,具体是通过propagateCancel这个函数,现在我们逐句解释一下:
// 1.14版本的go语言代码
// propagateCancel arranges for child to be canceled when parent is.
func propagateCancel(parent Context, child canceler) {
	done := parent.Done()
	// 这里我看到有一些解释是说empty context类型的就直接返回了,但是其实value context的Done()函数返回的
	// 也是nil,这个我觉得更确切的就是说明当前context的parent context的Done()函数没有实现,你根本就不可能
	// 实现配合parent的cancel行为来搞事,你能实现的cancel场景只能靠自己,所以这里就没有必要和parent产生
	// 关联了,所以直接return
	if done == nil {
		return // parent is never canceled
	}

	select {
	case <-done:
		// parent is already canceled
		// 这里应该比较好理解,parent已经done了,context作为可以集联cancel的数据结构,现在也没什么等的了
		// 直接cancel就完事了
		child.cancel(false, parent.Err())
		return
	default:
		// 有了这个case,编译器其实就帮忙转换成了selectnbchanrecv这个函数
	}

	// 这里的parentCancelCtx函数在1.14版本和大家在网上常看到的有点不太一样了,后面解释
	if p, ok := parentCancelCtx(parent); ok {
	  // 要操作cancel类型的parent的children数据,临界区需要加锁
		p.mu.Lock()
		if p.err != nil {
			// parent has already been canceled
			// 在select block中检查过,到这里可能仍然会发生parent has been cancelel的事情
			// 所以需要再检查一遍
			child.cancel(false, p.err)
		} else {
		  // lazy方式创建children
			if p.children == nil {
				p.children = make(map[canceler]struct{})
			}
			p.children[child] = struct{}{}
		}
		p.mu.Unlock()
	} else {
		atomic.AddInt32(&goroutines, +1)
		// 走到这个分支,说明用户自己实现了Done接口,但是他不是我们常规的cancel类型(包括WithTimeout和WithDeadline生成的),但是也要实现和常规cancel类型一样的集联cancel功能
		go func() {
			select {
			case <-parent.Done():
				child.cancel(false, parent.Err())
			case <-child.Done():
			  // 用户自己的cancel不需要再处理什么了
			}
		}()
	}
}
parentCancelCtx相关函数如下:
// parentCancelCtx returns the underlying *cancelCtx for parent.
// It does this by looking up parent.Value(&cancelCtxKey) to find
// the innermost enclosing *cancelCtx and then checking whether
// parent.Done() matches that *cancelCtx. (If not, the *cancelCtx
// has been wrapped in a custom implementation providing a
// different done channel, in which case we should not bypass it.)
func parentCancelCtx(parent Context) (*cancelCtx, bool) {
	done := parent.Done()
	if done == closedchan || done == nil {
		return nil, false
	}
	// Value接口会一直往上找,实现注释中说的find the innermost enclosing *cancelCtx
	p, ok := parent.Value(&cancelCtxKey).(*cancelCtx)
	if !ok {
		return nil, false
	}
	p.mu.Lock()
	// 判断parent的done和正规军(WithCancel、WithTimeout、WithDeadline创建的)的done是不是同一个东西
	ok = p.done == done
	p.mu.Unlock()
	if !ok {
	  // 不是同一个东西,所以在propagateCancel函数中要单开一个goroutine来做这个事情
		return nil, false
	}
	return p, true
}
之前有过在了解内存管理的源码是比较想知道的一个事情是,对于mcache、mspan这种管理类型数据的内存分配,是否也需要通过heapArena来提供相应的内存吗?
我们首先可以看mcache的分配函数:
func allocmcache() *mcache {
	var c *mcache
	systemstack(func() {
		lock(&mheap_.lock)
		// mcache结构分配处
		c = (*mcache)(mheap_.cachealloc.alloc())
		c.flushGen = mheap_.sweepgen
		unlock(&mheap_.lock)
	})
	for i := range c.alloc {
		c.alloc[i] = &emptymspan
	}
	c.next_sample = nextSample()
	return c
}
从上文我们可以看到mcache这个结构是通过mheap_.cachealloc.alloc() 来进行分配的,因此我们可以看一下cachealloc的相关信息:
// Main malloc heap.
// The heap itself is the "free" and "scav" treaps,
// but all the other global data is here too.
//
// mheap must not be heap-allocated because it contains mSpanLists,
// which must not be heap-allocated.
//
//go:notinheap
type mheap struct {
    // ...
    spanalloc             fixalloc // allocator for span*
    cachealloc            fixalloc // allocator for mcache*
}
可以看到cachealloc是一个fixalloc,即分配固定长度的allocator,他的初始化位置如下:
// Initialize the heap.
func (h *mheap) init() {
	h.spanalloc.init(unsafe.Sizeof(mspan{}), recordspan, unsafe.Pointer(h), &memstats.mspan_sys)
	// mcache的初始化
	h.cachealloc.init(unsafe.Sizeof(mcache{}), nil, nil, &memstats.mcache_sys)
	h.specialfinalizeralloc.init(unsafe.Sizeof(specialfinalizer{}), nil, nil, &memstats.other_sys)
	// ...
}
这里的初始化其实只是设定了单次分配的内存空间,及mcache关联的统计数据,细节如下:
// Initialize f to allocate objects of the given size,
// using the allocator to obtain chunks of memory.
func (f *fixalloc) init(size uintptr, first func(arg, p unsafe.Pointer), arg unsafe.Pointer, stat *uint64) {
	f.size = size
	f.first = first
	f.arg = arg
	f.list = nil
	f.chunk = 0
	f.nchunk = 0
	f.inuse = 0
	f.stat = stat
	f.zero = true
}
让我们再回到a llocmcache这个函数中的mheap_.cachealloc.alloc()中,相应的细节为:
func (f *fixalloc) alloc() unsafe.Pointer {
	if f.size == 0 {
		print("runtime: use of FixAlloc_Alloc before FixAlloc_Init\n")
		throw("runtime: internal error")
	}

  	// 这个free就是buffer中常用的freelist,用来存储已经空闲的内存,为了下次使用
	if f.list != nil {
		v := unsafe.Pointer(f.list)
		f.list = f.list.next
		f.inuse += f.size
		if f.zero {
			memclrNoHeapPointers(v, f.size)
		}
		return v
	}
	if uintptr(f.nchunk) < f.size {
	  	// 申请大块内存用来后续的持续分配内存,跟进去看可以发现这个函数最后调用了sysAlloc
		f.chunk = uintptr(persistentalloc(_FixAllocChunk, 0, f.stat))
		f.nchunk = _FixAllocChunk
	}

	v := unsafe.Pointer(f.chunk)
	if f.first != nil {
		f.first(f.arg, v)
	}
	f.chunk = f.chunk + f.size
	f.nchunk -= uint32(f.size)
	f.inuse += f.size
	return v
}
因此通过这个分析我们可以知道,像mcache这种管理类的数据结构,其内存的分配肯定是不走heapArena的方式。
记chanrecv中不使用锁实现快速判断失败场景的小技巧
我们知道锁的开销是很大的,对于大块的临界区判断逻辑,我们经常需要加锁来保证同步,但是如果只是单个变量的读写使用锁来避免竞争成本就太高了,更多的是使用atomic包中提供的函数。 那么现在我们看一下在chanrecv中上述情况的使用,比较精妙,他利用了数据之前的逻辑关联,通过每个变量的atomic操作同样实现了类似加锁的效果。
该段代码如下:
	// Fast path: check for failed non-blocking operation without acquiring the lock.
	//
	// After observing that the channel is not ready for receiving, we observe that the
	// channel is not closed. Each of these observations is a single word-sized read
	// (first c.sendq.first or c.qcount, and second c.closed).
	// Because a channel cannot be reopened, the later observation of the channel
	// being not closed implies that it was also not closed at the moment of the
	// first observation. We behave as if we observed the channel at that moment
	// and report that the receive cannot proceed.
	//
	// The order of operations is important here: reversing the operations can lead to
	// incorrect behavior when racing with a close.
	if !block && (c.dataqsiz == 0 && c.sendq.first == nil ||
		c.dataqsiz > 0 && atomic.Loaduint(&c.qcount) == 0) &&
		atomic.Load(&c.closed) == 0 {
		return
	}
注释中给了一些解释,但是有的地方我个人光看这个注释还是有点懵,就记录一下我的描述: 这段代码的概要逻辑是,如果是非阻塞的recv操作并且chan中没有数据,那么直接返回; 我们可以将上述代码的逻辑分成两步:
- 判断chan中是否要可以读取的数据;
- 判断chan是否已经关闭了;
如果chan没有关闭,那么我们已知读不出数据的情况下,肯定就直接return (false, false)了;
如果使用锁来同步的话,伪代码如下:
lock()
chan is empty
chan is not closed
unlock()
Return
那么这个临界区内就两块逻辑,恰巧这两块逻辑其实都可以用atomic来实现,我们逐步分析; 首先是
chan is empty这段逻辑,原文的代码如下:c.dataqsiz == 0 && c.sendq.first == nil || c.dataqsiz > 0 && atomic.Loaduint(&c.qcount) == 0其中的c.dataqsiz是在编译期就可以确认的了,对于确定的channel其实就是执行
c.sendq.first == nil或atomic.Loaduint(&c.qcount) == 0这两条指令都可以实现原子操作;
其中c.sendq.first == nil这一句我认为至少在amd64架构下是可以实现原子读取first的内容,因为在atomic_amd64.go中load指针就是一句话的事func Load64(ptr *uint64) uint64 { return *ptr},这说明指针数据可以直接原子获取指针内容;
其中的c.dataqsiz是在编译期就可以确认的了,对于确定的channel其实就是执行c.sendq.first == nil或atomic.Loaduint(&c.qcount) == 0这两条指令都可以实现原子操作(;其中c.sendq.first == nil这一句我认为至少在amd64架构下是可以实现原子读取first的内容,因为在atomic_amd64.go中load指针就是一句话的事func Load64(ptr *uint64) uint64 { return *ptr},这说明指针数据可以直接原子获取指针内容);
后面还接了一个原子读操作并判断是否为0,atomic.Load(&c.closed) == 0,那么现在就可以总结这两段逻辑主要就是:原子读取channel中是否有数据和原子读取chan是否关闭,这两段内容与其他goroutine产生操作重叠只有下面这种情况:
a.原子读取channel中是否有数据—>b.其他goroutine对channel的close读写操作—>c.原子读channel中的closed字段是否为0,
即使产生了这样的场景,那么在c中判断为0的话也只能说明之前就channel就是unclosed,并且channel不会被close多次,即使在两个原子读操作之前有其他goroutine对其进行相关操作也没有关系。 所以这里的两个原子读操作和给这块临界区域加锁的效果是一样的,但是却比加锁的成本小很多,很精彩。